This chapter contains the following topics:
Introduction to Aged Open Items
Printing the Aged Open Items Report
Aging periods by specific dates
Using the Aged Open Items Report For Projections
The Aged open items selection enables you to print a report showing all open items as of the date you specify (called the aging date). The Aged Open Items Report shows the age of open items, in days, as of the aging date and groups them into aging periods.
In order for the Aged Open Items Report to be accurate, you must be using Vendor history.
You can define aging periods either in terms of days (0-30 days, 31-60 days, etc.) or in terms of specific dates (3/16/15 to 4/10/15, 2/28/15 to 3/15/15, etc.).
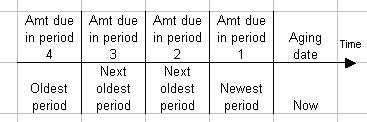
Up to four aging periods are printed based on the aging parameters you specify:
|
Note |
Another way to obtain a report of payables that are outstanding as of the end of an accounting period is the Open Payables by Date Report. This report shows all payables outstanding as of the end of an accounting period (even if they have been subsequently paid). However, this report, which may only be printed if you are using vendor history, is best used to validate your A/P account balance in General Ledger. |
Each voucher dated on or before the aging date is put into an aging period according to either its invoice date or due date.
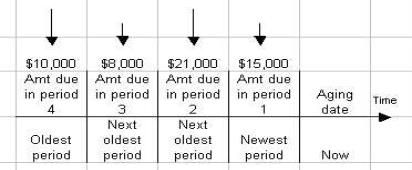
The vendor’s balance in each aging period is obtained and shown on the Aged Open Items Report.
If you enter negative numbers for the number of days in the aging periods, this report can be used to show projected payables for future periods. Refer to the Using the Aged Open Items Report For Projections section at the end of this chapter.
Select
Aged open items from the Reports menu.
You may view an Aged Open Items Detail example in the Sample Reports appendix.
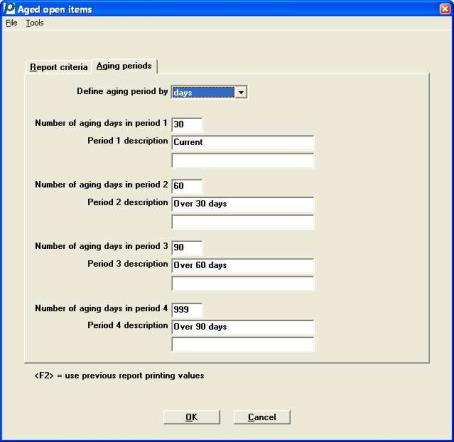
The following screen appears:
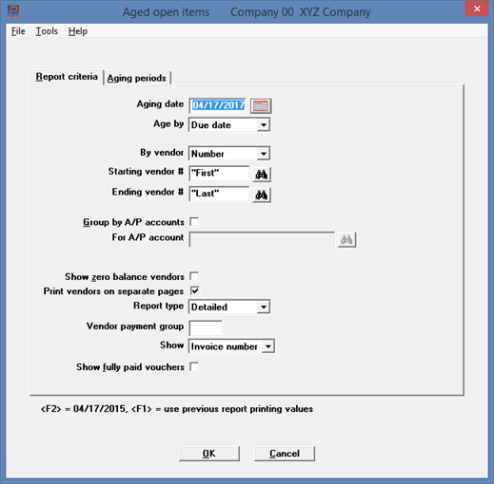
This is the first of two tabs needed to define the output of this report. When you have provided the requested information in both tabs, you will be asked whether you wish to save the values entered to re-use the next time you print the report.
In the character based version this screen displays:
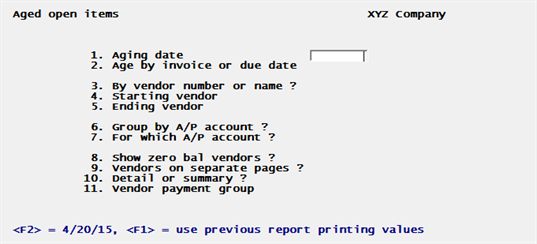
Enter the following fields:
This is the date which is used to calculate the age of items. Items later than this date are not considered in calculating vendor balances.
Options
Enter the date, or use one of the options:
|
<F2> |
For the system date (today’s date). All documents entered are considered in calculating balances. |
|
<F1> |
To use the report values from the last time this report have been printed and the values were saved. This option is only available after this report has been printed at least once. If chosen: - In graphical mode the field values will fill in and you may select OK or first review the values for the Aging periods tab. - In character mode the screen will fill with the available values and the cursor will move to Field number to change?. |
|
Format |
MMDDYY |
|
Example |
Press <F2> |
|
Note |
If the open item you selected is before the aging date and the payment is after the aging date, the report will indicate that the item has not been paid. |
You may assign items to aging periods based on the due date or vendor invoice date.
Select Invoice date to age open items by invoice date or Due date by age by due date.
|
Format |
Drop down list |
|
Example |
Press <Enter> for the default. |
Open items may be printed, in order, by vendor number or by vendor name. Select Number or Name.
|
Format |
Drop down list |
|
Example |
Select Number |
Starting vendor #
Ending vendor #
Options
Enter the range of vendors, by number or name, to be included in the report. It is not required that either entry be entered, but the range specified should enclose at least one vendor. Numbers are entered if you entered by vendor number at the By vendor field, or names if you entered by vendor name. At each field you may use one of the options:
|
<F2> |
For the "First" starting vendor or "Last" ending vendor |
|
<F3> |
(If entering names) To toggle between entering a person’s name and a company name. The default format is a company name. |
|
Format |
For a vendor number: 6 characters For a company name: 25 characters For a person’s first name: 14 characters For a person’s last name: 10 characters |
|
Example |
Press <F2> at each field |
This field displays as (Not applicable) and may not be entered if you are printing by vendor name.
Otherwise, state here whether you want to group vendors by A/P account. All vendors for a certain A/P account appear together.
| • | If you check the box, you will be prompted to print open items for a specific A/P account or to print open items for all A/P accounts, grouping them by A/P account number. |
| • | If you don't check the box, vendors are printed in sequence by name or number without regard to A/P account. |
|
Format |
Check box |
|
Example |
Select the <Space bar> to check the box |
This field cannot be entered if you are printing by vendor name or if you are not grouping by account number.
Options
Otherwise, enter the account number to restrict the report to the specific account. This account number must be a valid entry in A/P accounts. You may use one of the options:
| <F1> | For the next A/P account |
|
<F2> |
For the default A/P account from Control information |
|
<F5> |
For All accounts. The report will be grouped by vendor within account number. |
|
Format |
Your standard account number format, as defined in Company information |
|
Example |
Press <F5> |
Your answer here determines whether vendors with a zero balance (as of the aging date) appear on the report.
|
Format |
Check box |
|
Example |
Select the <Space bar> to check the box |
Print vendors on separate pages
Check this box if you want to print vendors on separate pages. This could be useful if you want to include the matching aging report page when mailing a payment to your vendor.
|
Format |
Check box |
|
Example |
Select the <Space bar> to check the box |
Select Detailed to print a detailed report, or Summary for a summary report.
The summary report shows the total account balance for each aging period, while the detailed report shows all items for each vendor in addition to the aging balances.
|
Format |
Drop down list. The default is Detailed. |
|
Example |
Press <Enter> for the default |
Options
If you have chosen to use payment groups (in Vendors), you can restrict the report to a specific group. Enter the vendor payment group, or use the option:.
|
<F5> |
For "All" vendor payment groups |
|
<Enter> |
Only selects those vendors which have not been assigned to a specific payment group. |
|
Format |
3 characters |
|
Example |
Select <F5> for "All" |
This field appears only if you are printing a detail report. You may elect to print the open item’s purchase order number or the open items’s invoice number on the report.
Select P.O. Number to print the purchase order number, or Invoice number to print the vendor’s invoice number.
|
Format |
Drop down list, the default is Invoice number |
|
Example |
Select <Enter> for the default |
This field may only be entered if you are printing a detail report. You may want to print all fully paid vouchers and not just the fully open or partially paid items.
Select the <Space bar> check the box to print all unpaid, partially paid and fully paid open items. Select <Enter> to print only unpaid or partially paid open items.
|
Format |
Use the <Space bar> or mouse with a check box |
|
Example |
Select <Enter> to not show fully paid vouchers. |
Make any needed changes. Press <Enter> for the second screen where you will define the aging periods for the report.
The second screen appears as follows:
In character mode, the following screen displays:
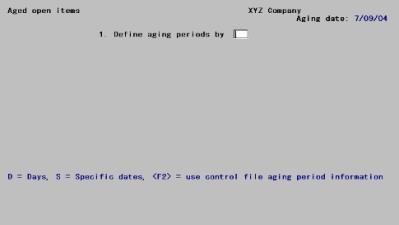
You can define aging periods using specific dates or by the number of days included in each aging period.
Options
Select Days to define aging periods in terms of days, Specific dates to define them by specific dates, or use the option:
|
<F2> |
If you saved all of the entries from the last time you printed this report, you may press <F2> to re-use all of those entries.
If you did not save previous entries, press <F2> to use the aging periods defined in A/P control information .
Pressing <F2> fills the screen with data and positions the cursor at Field number to change? |
|
Format |
Drop down list, the default is Days |
|
Example |
Select <Enter> for the default of Days |
If you select Days, refer to the section below, Aging periods by days, for instructions. If you select Specific dates, continue at the Aging periods by specific dates section.
If you select aging periods by days, the remainder of the screen appears as follows:
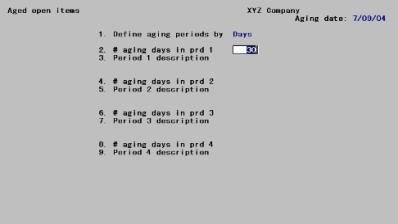
Enter the following information:
Number of aging days in period 1
Enter the number of days in the first aging period.
|
Format |
999- The default is the number of days for the corresponding period from A/P Control information |
|
Example |
Press <Enter> |
|
Note |
The field names “Number of aging days in period.” are a little misleading. Your entries will not really specify the “number” of days in each aging period, but, rather, a cut-off number of days for each aging period from the aging date you enter. |
Options
Enter a description for aging period 1 or use the option:
|
<F2> |
For the description default from the aging program. |
|
Format |
2 lines of 13 characters each |
|
Example |
Press <F2> |
Enter the number of aging or “cut-off “days that will define the limits for the second and subsequent periods in the same way as the first period. Days must be in ascending sequence.
Note that negative days are allowed for all periods:
| • | If you are using today’s date as the aging date, negative age is meaningful when aging by due date. This implies that the payable is not due yet. |
| • | If you are aging by invoice date, negative age implies that you received the bill before the vendor sent it. |
| • | Another use for negative days occurs when you set the aging date in the future, resulting in a projection report. |
An entry of 999, in any of the aging days fields, serves to extend the period infinitely into the past. Though it may be entered for any period, It is normally entered for the fourth period.
| • | If some number less than 999 is entered in the fourth period, open items older than that number of days will not be included in any aging period. Those items will, however, be included in the vendor balance amounts (total and net). On a detail report, individual open item information will also be provided. |
| • | Any voucher older than 999 days is shown on the report as 999 days old. |
| • | If you wish to use fewer than four age ranges, enter 999 for the third period (and if desired for the second period) as well as for the fourth period. |
|
Format |
999- The default is the number of days for the corresponding period from A/P Control information |
|
Example |
Press <Enter> at each field |
Options
Enter a description for the remaining periods in the same way as for the first period. You may use the option:
|
<F2> |
For the description of the corresponding period from A/P Control information |
|
Format |
2 lines of 13 characters each |
|
Example |
Press <F2> at the first field. |
Make any desired changes. Select OK to print the report or Cancel to not print.
This section describes what happens after you have completed the aging periods to include on the report. It applies whether you define the aging periods by days or by specific dates.
After pressing <Enter> or clicking on the OK button after the last field, the following prompt will display:
Save values just entered?
This question does not appear if you are using saved values and have not changed them. Otherwise:
| • | Answer Yes to save the values you have just entered for use the next time you or anyone else prints the report. Previously saved values will be lost. |
| • | Answer No to not save the values you have just entered. Previously saved values will be preserved. |
|
Format |
Two buttons, Yes or No |
|
Example |
Select Yes |
Printer selection
Select a printer.
You may also print the report to disk, view html or PDF files of the report.
If you specified aging periods by specific dates in the Define aging periods by field the remainder of the screen appears as follows:
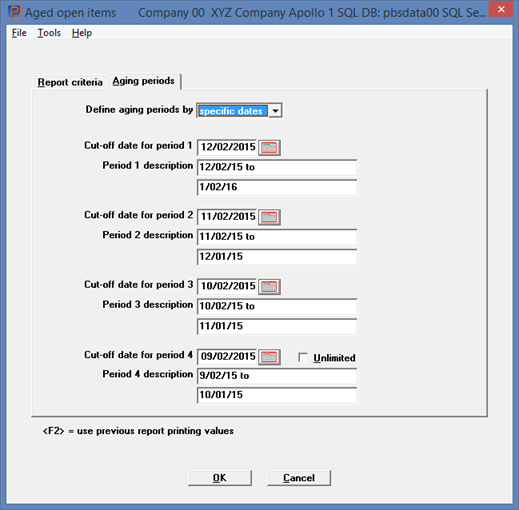
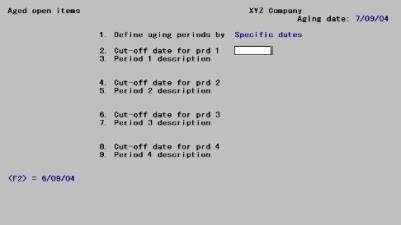
The first aging period ends with the “Aging date”, entered on the first screen, and starts with the “Cut-off date for prd1. For example, if you entered an “Aging date” of 9/30/05 and you entered a period 1 cut-off date of 9/1/05, the first period would include dates from 9/1/05 through 9/30/05.
The starting dates of subsequent aging periods are defined by the cut-off dates you enter. The ending date of each period is the day before the cut-off date of the previous period. To continue the example, if you enter a cut-off date of 8/1/05 for the second period, that period will run from 8/1/05 through 8/31/05. Note that the ending date of period 2 is one day less than the period 1 cut-off date.
Including items past aging date
When aging by due date, it is sometimes useful to include items which are “past the aging date.”
In order to include items past the aging date, you move the aging date forward in time to the last date on which a payable can be expected to be due, and then use the second parameter screen to control the aging periods appropriately. For example, if the aging date is July 31, 2005, and you know that there are no payables posted that are due (based on the normal terms given by your vendors) after Sept 30, 2005, you set the aging date as Sept 30, 2005. Then, using the second parameter screen, you could set your period cut-offs as follows:
|
Period 1 cut-off: |
July 1, 2005 |
|
Period 2 cut-off: |
June 1, 2005 |
|
Period 3 cut-off: |
May 1, 2005 |
|
Period 4 cut-off: |
<F2> for Unlimited |
With this setup, all payables due from July 1st. through Sept 30th appear together in the first aging period, all payables due from June 1st. through June 30th appear in the second aging period, all payables due from May 1st. through May 31st. appear in the third aging period, and all payables due on or before April 30th appear in the fourth aging period.
Enter the following information:
Options
Enter the starting date for period 1, or use the option:
|
<F2> |
For a date thirty days earlier than the aging date (not one month earlier). |
|
Format |
MMDDYY |
|
Example |
(Does not occur in this example because you selected days at Define aging periods by) |
Period 1 description
Options
Enter a description of period 1, or use the option:
|
<F2> |
To use the description for mm/dd/yy to mm/dd/yy>, where the first date is the cut-off date of the first period and the second is the aging date |
|
Format |
2 lines of 13 characters each |
|
Example |
(Does not occur in this example because you selected days at Define aging periods by) |
Cut-off date for period 2
Cut-off date for period 3
Cut-off date for period 4
Select the <Space bar> to check the box for Unlimited where all documents older than the period 3 cutoff date are included or select the <Enter> key for the limited date range.
Options
Enter the starting date for subsequent periods in the same way as for the first period. You may use one of the options:
|
<F2> |
For a date one month (not 30 days) earlier than the cut-off date of the previous period |
|
<F1> |
(Available for Period 4 only) For Unlimited. All documents older than the period 3 cut-off date are included in aging period 4. |
|
Format |
MMDDYY |
|
Example |
(Does not occur in this example because you selected days at Define aging periods by) |
Period 2 description
Period 3 description
Period 4 description
Options
Enter the description for subsequent periods in the same way as for the first period. You may use the option:
|
<F2> |
In Period 2 description and Period 3 description , and in Period 4 description except when <F2> has been pressed at Number of aging days in period 4: For mm/dd/yy to mm/dd/yy>, where the first date is the cut-off date of the current period and the second is the day before the cut-off date of the preceding period In Period 4 description , when <F2> has been pressed at Number of aging days in period 4: Older than mm/dd/yy>, where the mm/dd/yy is the cut-off date of the third period |
|
Format |
2 lines of 13 characters each |
|
Example |
(Does not occur in this example because you selected days at Define aging periods by) |
Make any needed changes. Press <Enter> to continue or click on the OK button. You may also select the Cancel button to return to the main menu.
The Aged Open Items Report can be used to show projected payables (payables due in future periods) as well as age past due payables. You may create a projections report by adjusting the aging information in A/P Control information or, on a temporary basis, by entering negative aging days in the Aged open items selection. Aging should be set to “Days.”
The following example shows the A/P Control information set-up needed to print a report in projection format.
|
Period |
Days |
Description |
Comment |
|
1 |
-90 |
Due over 90 |
Items due in more than 90 days from aging date |
|
2 |
-60 |
Due 61-90 |
Items due in 61 to 90 days |
|
3 |
-30 |
Due 31-60 |
Items due in 31 to 60 days |
|
4 |
0 |
Due 1-30 |
Items due in the next 30 days |
In the projection format, period 4 must be the most current period and period 1 the furthest in the future.
Once changes have been made in A/P Control information, you can run this function, using AP Control information defaults, to produce the projection report.
|
Note |
You may also enter these numbers directly on screen 2 of the Aged open items selection to generate payables projections. |